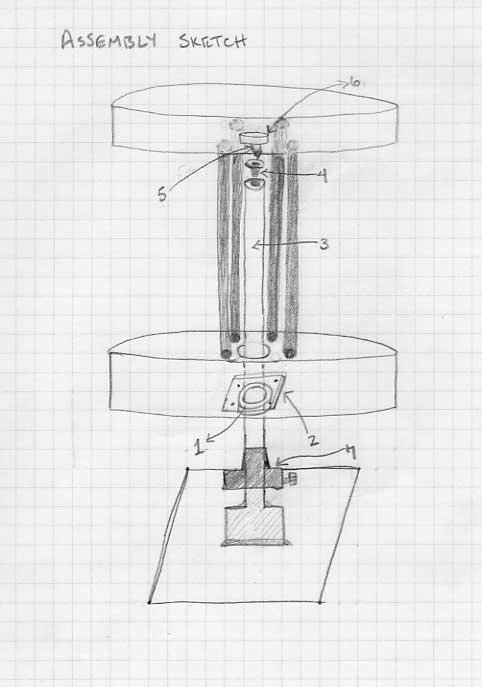

We’ll start with a sketch of the wheel and its metal components. I had a craftsman make my metal parts and do some welding.
The wheel is extremely simple: A flywheel connected to a wheel head via four stretchers. In the subsequent pics, you will see that I
drilled holes and inserted round stretchers with glue. The wheel is permanently assembled. It is impossible to disassemble. Traditional wheels generally use square or rectangular stretchers which are connected to the two wheels via mortise and tenon, with wedges in place to tighten the joints and allow for fine adjustments. After using both types, I don’t have a preference.
Here are two examples of wheels. My homemade version is on the left and a traditional version on the right.

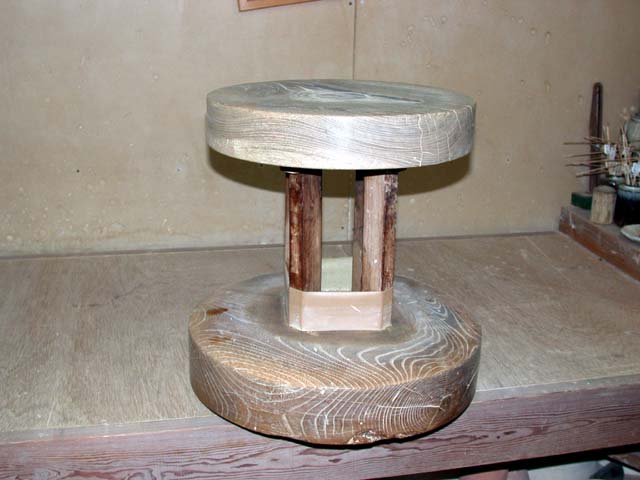
The wood used is not terribly important. Mine is a combination of scavenged cedar and maple. The Japanese models are usually zelkova (a type of heavy, dense elm). I have seen versions in Korea made of pine.
Stretcher length is not set in stone. Mine are too long, and the wheel head is subsequently so high that for throwing I need a pretty high seat to allow for kicking and treading. For coil and paddle building it works great, with a regular seat height. Plan the stretcher length so that you can keep the flywheel as close as possible to the ground and have the wheel head at about the same level as your seat. Different people are differently sized and have differing leg length, so plan accordingly and build for your build.
Flywheel and wheel head thickness and diameter also vary wildly. I’ve seen all kinds. Keep in mind that too small limits the diameter of what you can make (but bats can fix that), and too big means you have to lean over more for smaller diameter work. I think 40cm diameter is a pretty good size, and you can adjust thickness based on what you have access too, and how heavy you want to make the wheel.
Shaft detail:


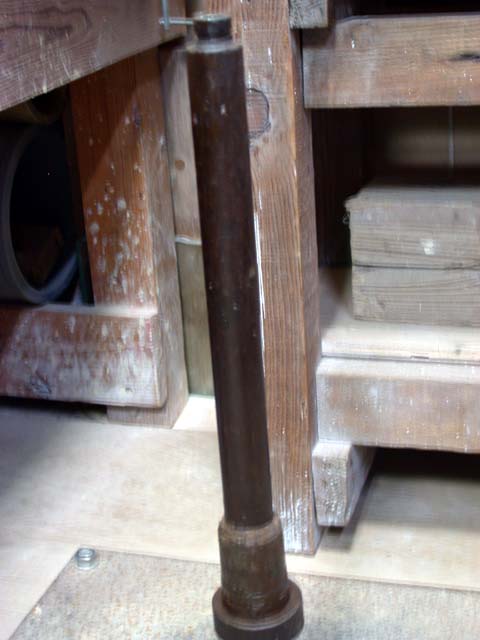
The shaft is tightly screwed quite deeply into a block which is welded onto a 5mm thick steel plate which is bolted down. In my studio the wheels are bolted into the concrete floor, but you can also bolt into a sheet of plywood and be a bit more mobile.
If you zoom in on the picture, you can see an insert resting in the top of the shaft. The shaft itself has a tapered hole drilled out, and a matching tapered cone receiver fits in the hole. The cone shaped depression in the cone receiver is of a wider angle than the angle of the cone that will rest here. This ensures that only the tip of the cone engages the receiver and that the minimal surface area of the cone’s point supports the entire weight of the wheel. Both the cone and the cone receiver are made from quench hardened carbon steel. For someone who doesn’t have access to hardened steel, the cone and cone receiver can be made from porcelain, fired, and used. The old wheels in Arita had glazed porcelain cones and receivers. I would also imagine that the shaft, cone receiver, and cone could also be made from a dense hardwood and be perfectly serviceable.
On the shaft, near the bottom, you will see a sleeve with a tapered section. This sleeve moves up and down on the shaft. When fitting the wheel onto the shaft, the sleeve is loosened and lowered as far as possible. After the wheel is seated on the shaft with the cone resting in the cone receiver, the sleeve is gently raised so that the taper VERY LIGHTLY engages the bearing. You don’t want the taper and bearing holding any of the weight of the wheel. 100% of the wheel’s weight should be resting on the cone at the top of the shaft. The taper and bottom bearing only exist to remove any sideways movement which would impede smooth wheel rotation. Once the tapered sleeve is in the right position, tighten the set screw firmly.
**I recently discovered that the bearing at the bottom is not strictly necessary. I recently repaired quite a few heavily rusted banding wheels of various sizes that had completely frozen bearings even after de-rusting. Despite the bearings being frozen, because they spin on their cone and because the bearings only slightly touch the taper on the shaft with a layer of grease in between, the wheels spin very nicely. So, if you don’t have access to bearings for some reason, don’t panic and just go without one. Having a bearing is slightly more convenient for adjustments, but not strictly necessary**
Additional Pictures:

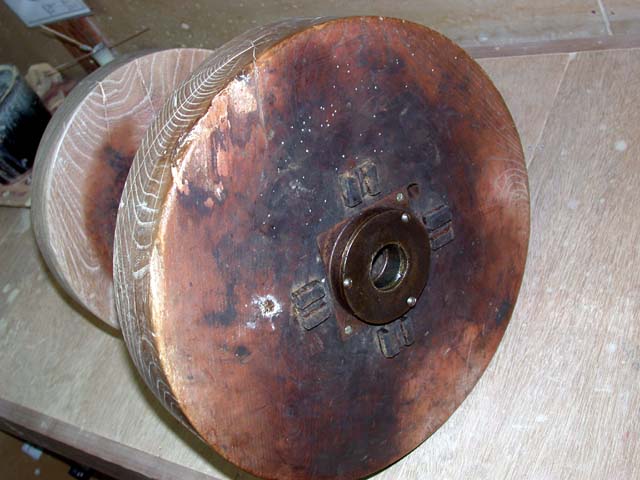

Here you can see the cone seated in the underside of the wheel head. The cone is seated in a square steel block with a taper, just like the cone receiver in the shaft head. Four wedges are hammered in to friction fit the steel block, and the tapered wedges allow for fine tuning to make sure the cone’s point sits dead center.
Under the fly wheel you can see the pillow block with the bearing, and the stretchers in full-through wedged mortise and tenon construction.
Some other things to consider:
– You don’t need a lathe to make your fly wheel and wheel head. If you start with a square and start sawing off corners, pretty soon you will have an almost round wheel. I recommend starting with a perfect square and marking dead center before you start cutting.
– You don’t need a drill press for your holes, if you decide to drill and glue round stretchers. I used a cheap drill guide with a stopper ring firmly attached, so that all the holes were exactly the same depth. I matched the drill bit diameter to the stretcher material, so that they needed to be pounded in with a mallet. There was no play in the fit. This ensures zero twist when assembling all the parts.
– Wrap rope or cord around the stretchers from the bottom up to about the halfway point. You don’t want your toes or foot going into those spinning stretchers. Good way to get broken toes.
Ok, I think that is pretty much everything you need to know to build a kickwheel. Now get busy!


